Breakout in Assembly
Technical details follow, and while I've tried my best to make it interesting and accessible I know that some of you just want to play the game. Here is a link to do just that.
Consolite (coming from "console lite") is the name I've given to my recent project of making a tiny hobbyist game console and associated toolchain. My end goal is to write a custom microprocessor and video controller that I can put on my Mimas V2 FPGA board. For prototyping purposes, I have first written an assembler and an emulator so that I can test out how writing games will work while easily making tweaks to the instruction set.
What is an assembler? In the case of Consolite, the assembler is a program that reads in a human-readable text file written in assembly language and converts it to binary instructions that the processor understands. It takes some code like this:
ADD A B ;This is a comment, it
SUB B A ;doesn't affect the output.
And turns each line into a 4-byte instruction like this (the following in hexadecimal):
0a 02 03 00
0b 03 02 00
In the first four bytes above, 0a represents the ADD instruction, 02 represents the register A, and 03 represents the register B. In the second four bytes, 0b represens the SUB instruction, and the registers are reversed. The fourth byte is unused in these instructions.
Documentation on the Consolite assembly language can be found here. It has special instructions for drawing pixels to the screen, setting colors, getting input, getting random numbers, and getting timing information, which facilitate the development of graphical applications (like games!). Source code for the assembler can be found written in C++ here and written in JavaScript here.
The emulator is a program that mimics the hardware that Consolite will run on, so that you can run it in a host environment like your desktop or browser. The Consolite microprocessor will have 64 KiB of RAM available for main memory, 48 KiB of video RAM available for the 8-bit 256 x 192 pixel display, and 16 general purpose registers, each of which are 16 bits wide. Each of these components as well as miscellaneous items like the instruction pointer must be emulated. At the end of this post you get to see the emulator in action when you play Breakout in your browser. Source code for the emulator can be found written in C++ here and written in JavaScript here.
After completing both the assembler and emulator, I wrote a port of the classic video game Breakout in my new assembly language so that I could test that everything was working. Source code for Breakout can be found here.
Breakout Memory Layout
When the emulator starts up, it first copies the binary instructions produced by the assembler into main memory. From there the emulator jumps to the first instruction and starts executing.
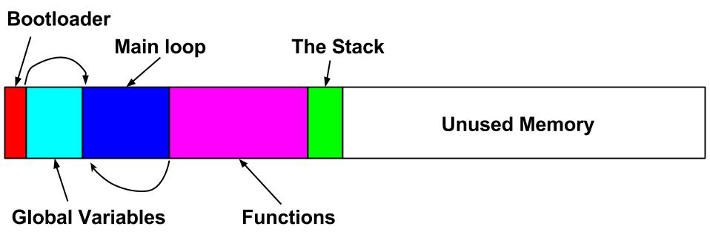
For Breakout the 64 KiB of main memory are logically separated into different sections, as you can see above.
- The bootloader does some initialization that is done only once, like drawing the white walls, then it jumps over the global variable storage to the start of the main loop.
- The global variables section stores values such as the x-coordinate of the paddle, or the user's score.
- The main loop handles input and drawing and moving around game components, and is run 60 times per second. At the end of the main loop, it waits until the full 16 milliseconds is up for the current frame and then jumps back to the beginning of the loop.
- The functions section contains code for such things as moving the paddle, checking for collision, destroying bricks, drawing rectangles, etc. The main loop switches control to these functions, which switch control back to the main loop when they are finished.
- The stack stores the values of any non-global variables that will not fit in the 16 general purpose registers. Most programs need to keep track of more than 16 values, so they use the stack. The stack grows down, away from the instructions so that it doesn't overwrite them.
- For Breakout, most of the memory is unused. The binary file is only 3,588 bytes as of this writing and it uses very few bytes for the stack.
Playing the Game
Before playing the game, you must click the Assemble and Run Emulator button below. This saves your browser the trouble of running an emulator while you're reading the article.
Controls
- Hit the spacebar or tap to start
- Left arrow key or touch the left side of the screen to move left
- Right arrow key or touch the right side of the screen to move right